

Custom Spectacle Frames: From Design Brief To Pre-Production Sample Approval

Custom spectacle frames should not begin with tooling. They should begin with a precise definition of what "custom" means. One buyer may only need a logo and new colors; another may need changed dimensions; a third may need a completely new frame developed from sketches, CAD drawings or a physical reference.
Because the scope changes cost, sampling and tooling, approve the project in stages: design brief, technical specification, material and color references, prototype, revision list and finally a pre-production "golden sample" for bulk production.
What Are "Custom Spectacle Frames"?
In B2B eyewear sourcing, custom spectacle frames can describe several very different development levels. It is important not to assume that every custom project needs a new mold.
| Customization Level | Typical Buyer Request | Development Route | New Tooling? |
|---|---|---|---|
| Private Label | Existing frame + logo, packaging or selected colors | Modify an existing production model | Usually no |
| Modified ODM | Existing base shape + changed dimensions, temples, hardware or color combinations | Engineering adjustment + new sample | Sometimes |
| Full Custom Development | New front shape, bridge, temples or construction from a design brief | Technical drawing, prototype and production engineering | Often, depending on material and process |
There is also a terminology point worth understanding. ISO 12870:2024 uses "custom-made frame" in a much narrower technical sense related to a frame made for the specific needs of an individual. In wholesale eyewear, however, buyers commonly use "custom" to mean brand or product customization. These are not automatically the same thing.
The commercial conclusion is simple: define the customization level before asking for a quotation. It prevents a logo-change project from being over-engineered and prevents a full-development project from being quoted like a stock frame.
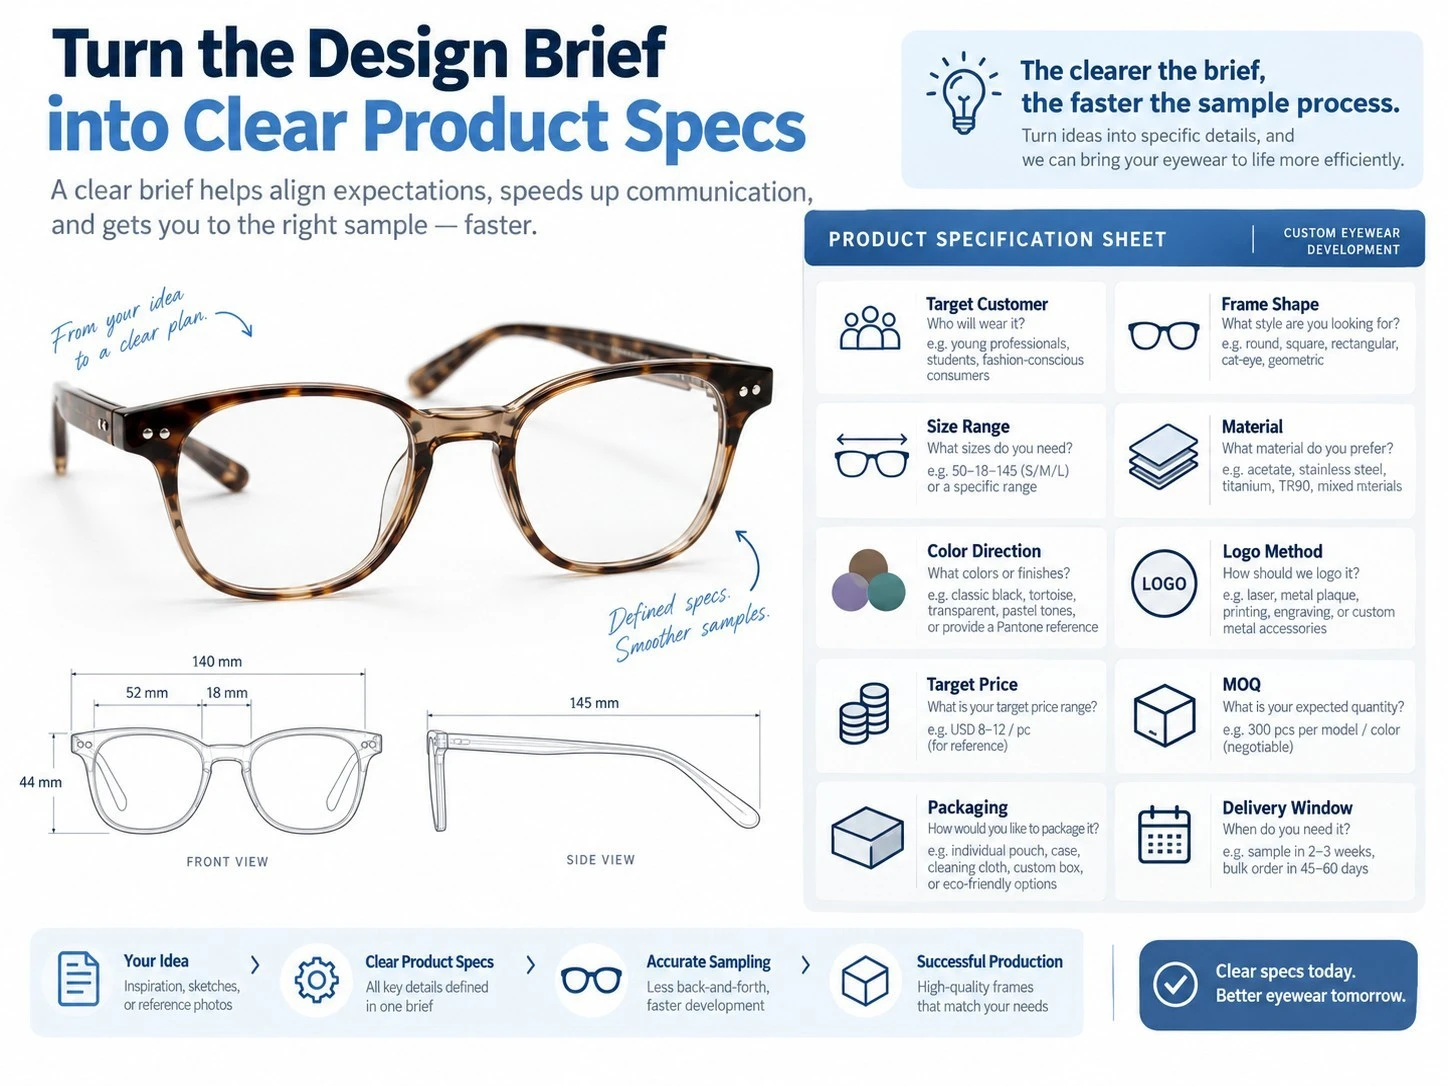
Step 1 - Turn the Design Brief Into a Clear Product Specification
A mood board is useful for direction, but it is not a production specification.
Before sampling, the manufacturer should know the target wearer, retail position, material, fixed dimensions, flexible details and destination market.
A practical brief should include:
- Front-view and side-view references
- Target lens shape and overall silhouette
- Target frame width, lens width, lens height, bridge and temple length
- Preferred frame material
- Target color family or physical color reference
- Hinge style and visible hardware preferences
- Logo method, size and placement
- Target quantity and expected launch date
- Packaging requirements
- Destination market and any required testing or documentation
This lets the factory separate aesthetic wishes from engineering constraints before the first sample. Finewell's OEM/ODM workflow likewise places prototype approval before bulk production.
Step 2 - Convert the Visual Design Into Technical Frame Specifications
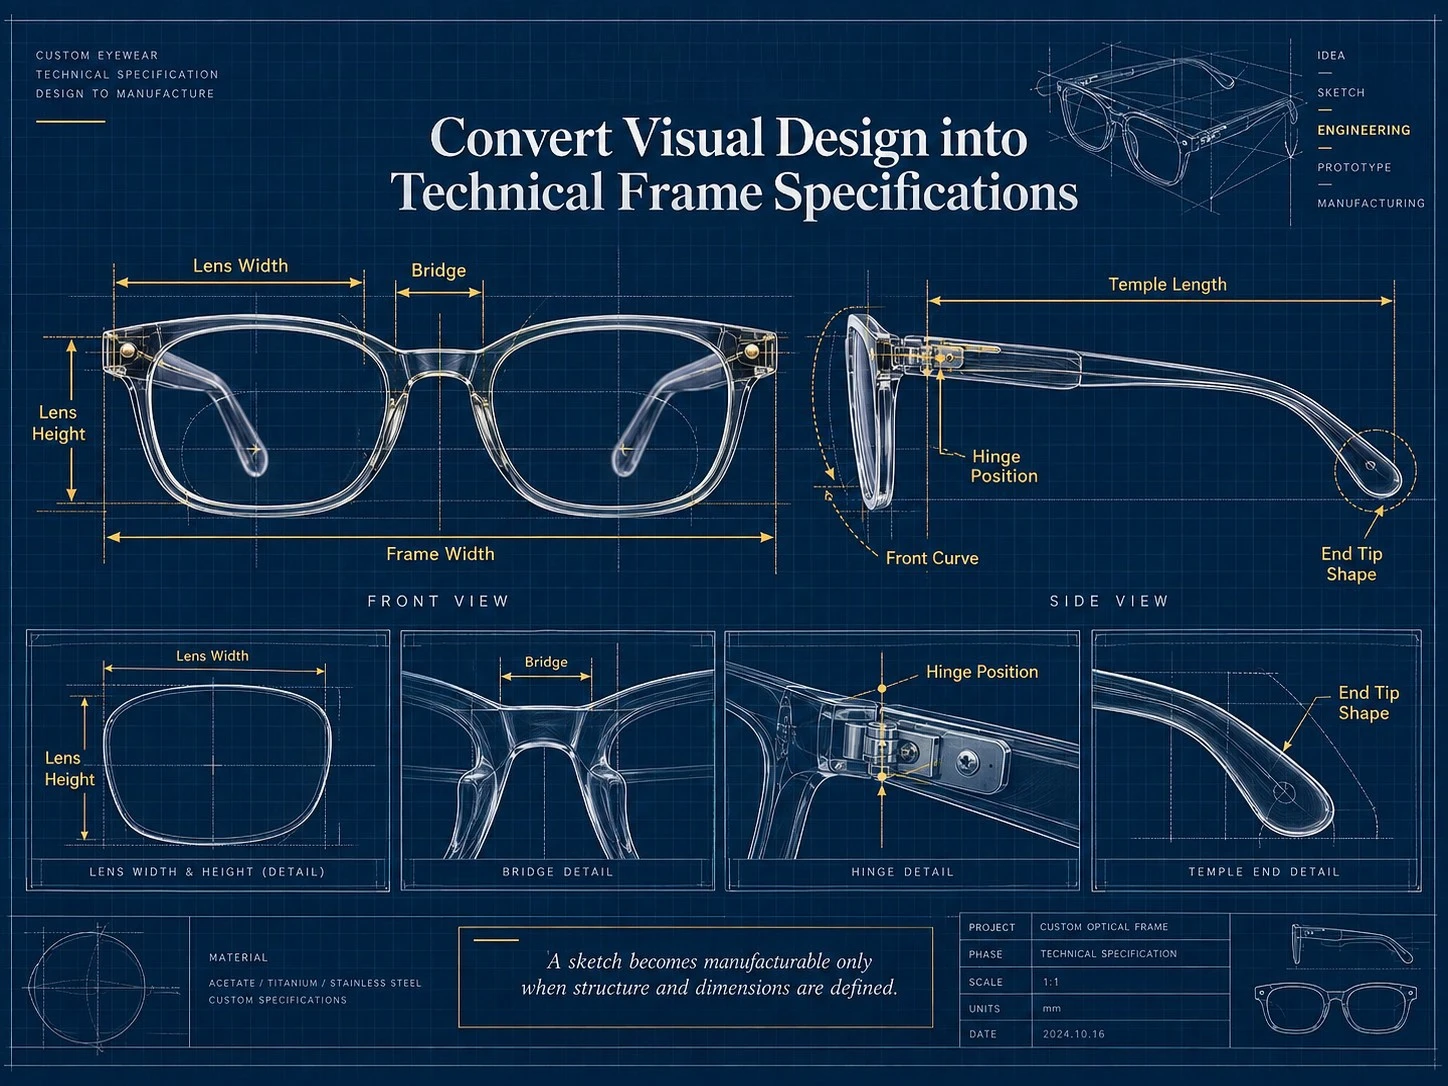
A frame can look correct in a rendering and still fail as a product.
The technical drawing should convert the visual concept into measurable geometry: lens width and height, bridge width, front width, temple length, frame thickness, end-piece geometry, hinge location, nose shape, temple opening and other construction details relevant to the design.
ISO 8624:2020 specifies a measuring system and vocabulary for spectacle frames with symmetrical fronts. Using consistent measurement terminology matters because "make it slightly wider" is subjective, while a confirmed dimension can be checked during sampling and QC.
The technical review should also consider lens installation. A narrow shape, thick rim or unusual bevel may look attractive in a sketch but still need enough structure for reliable lens fitting and repeatable production.
Step 3 - Confirm the Right Frame Material Before Sampling
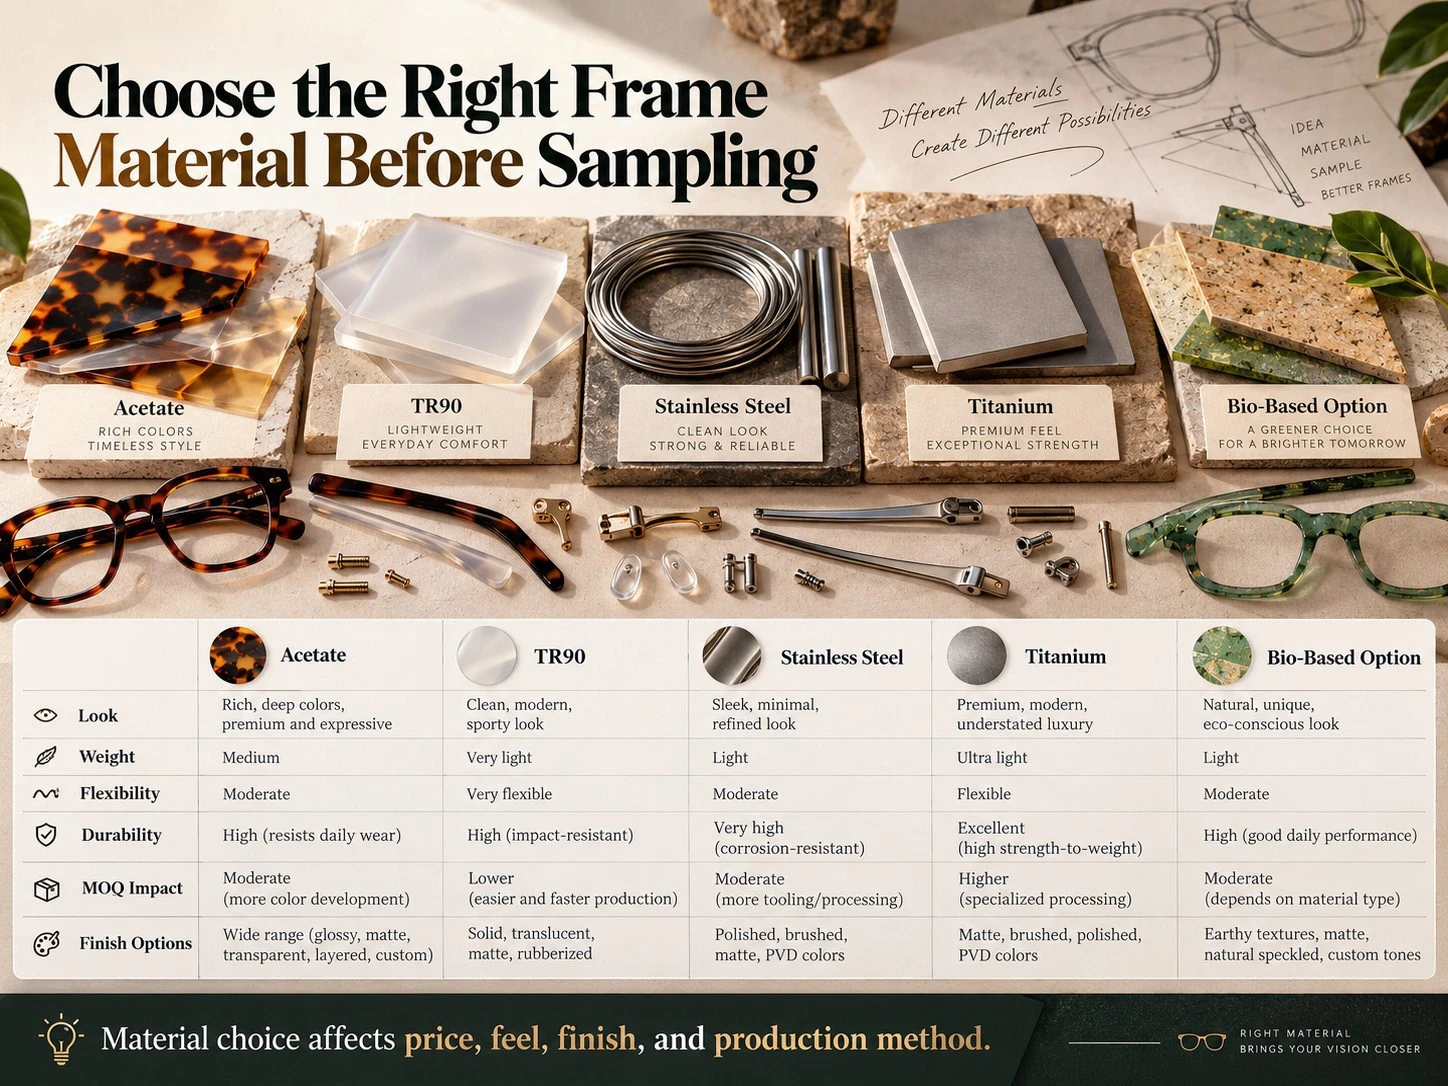
Do not approve geometry first and "decide the material later." Material is part of the engineering.
Acetate, TR90, injected plastic and metal use different forming, machining, molding, polishing, plating and assembly methods, so a shape developed around one process may need changes in another.
For buyers, the material decision should match the commercial role of the frame:
| Material Direction | Best Suited To | Development Concern |
|---|---|---|
| Acetate | Premium optical collections, rich patterns, thicker sculpted profiles | Sheet selection, machining, polishing, hinge construction |
| TR90 | Lightweight everyday optical frames | Mold feasibility, wall thickness, flexibility and color consistency |
| Injected Plastic | Scalable commercial programs | Tooling, molded geometry and production repeatability |
| Metal | Slim profiles, adjustable components, premium detailing | Plating, soldering, nose-pad and hardware specifications |
Changing material after a prototype is approved can affect dimensions, surface appearance, hinge construction and tooling. In practice, that means the project may need to return to the sampling stage.
Step 4 - Lock Color, Hardware and Branding Details
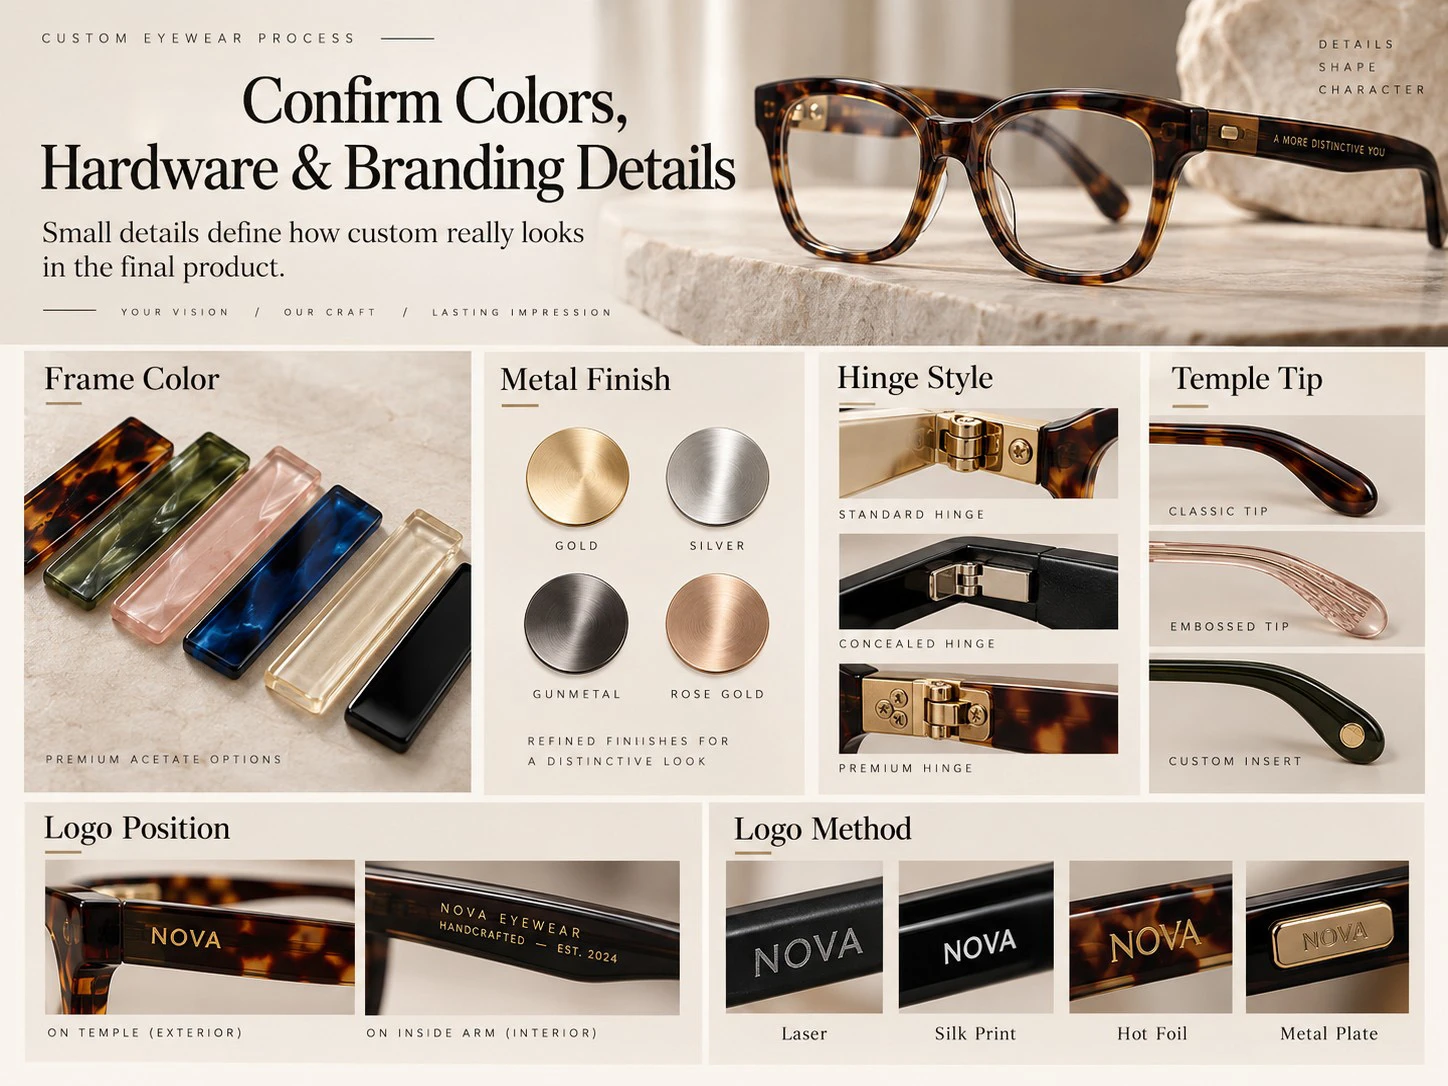
Color approval should use a physical reference whenever possible.
Pantone itself warns that on-screen simulations may not accurately match physical Pantone standards, and recommends physical reference samples when a project moves from digital design into a physical product.
For acetate frames, a specific acetate sheet code or approved physical chip is often more useful than a screenshot.
For injected frames, confirm the color standard and surface finish. For metal frames, define both plating color and finish-such as polished, matte or brushed-because the same nominal color can appear different on different surfaces.
Branding also needs production-ready information:
- Vector logo artwork
- Exact logo dimensions
- Placement from a fixed reference point
- Laser, printing, hot stamping, metal badge or other method
- Logo color and finish
- Left/right temple rules
- Whether model number, size or country-of-origin markings are required
For metal components sold into the EU, nickel-release requirements may also matter. REACH Annex XVII restricts nickel release from articles intended for direct and prolonged skin contact.
Step 5 - Prototype Development: What Is the First Sample Actually For?
The first prototype is not supposed to prove that the factory can make a beautiful presentation sample. Its job is to expose problems before mass production.
Review it as a manufacturing prototype:
- Is the overall silhouette correct?
- Are the dimensions within the agreed specification?
- Does the bridge sit as intended?
- Do the temples open evenly?
- Are the hinges positioned correctly?
- Is the lens shape practical to mount?
- Are the frame and temples symmetrical?
- Is the material thickness appropriate?
- Is the logo readable and correctly positioned?
- Are the color and finish realistic for bulk production?
Buyers should also distinguish "design preference" from "production defect."
If the bridge matches the approved drawing but the buyer now wants it narrower, that is a design revision. If the sample is outside the agreed tolerance, that is a production correction.
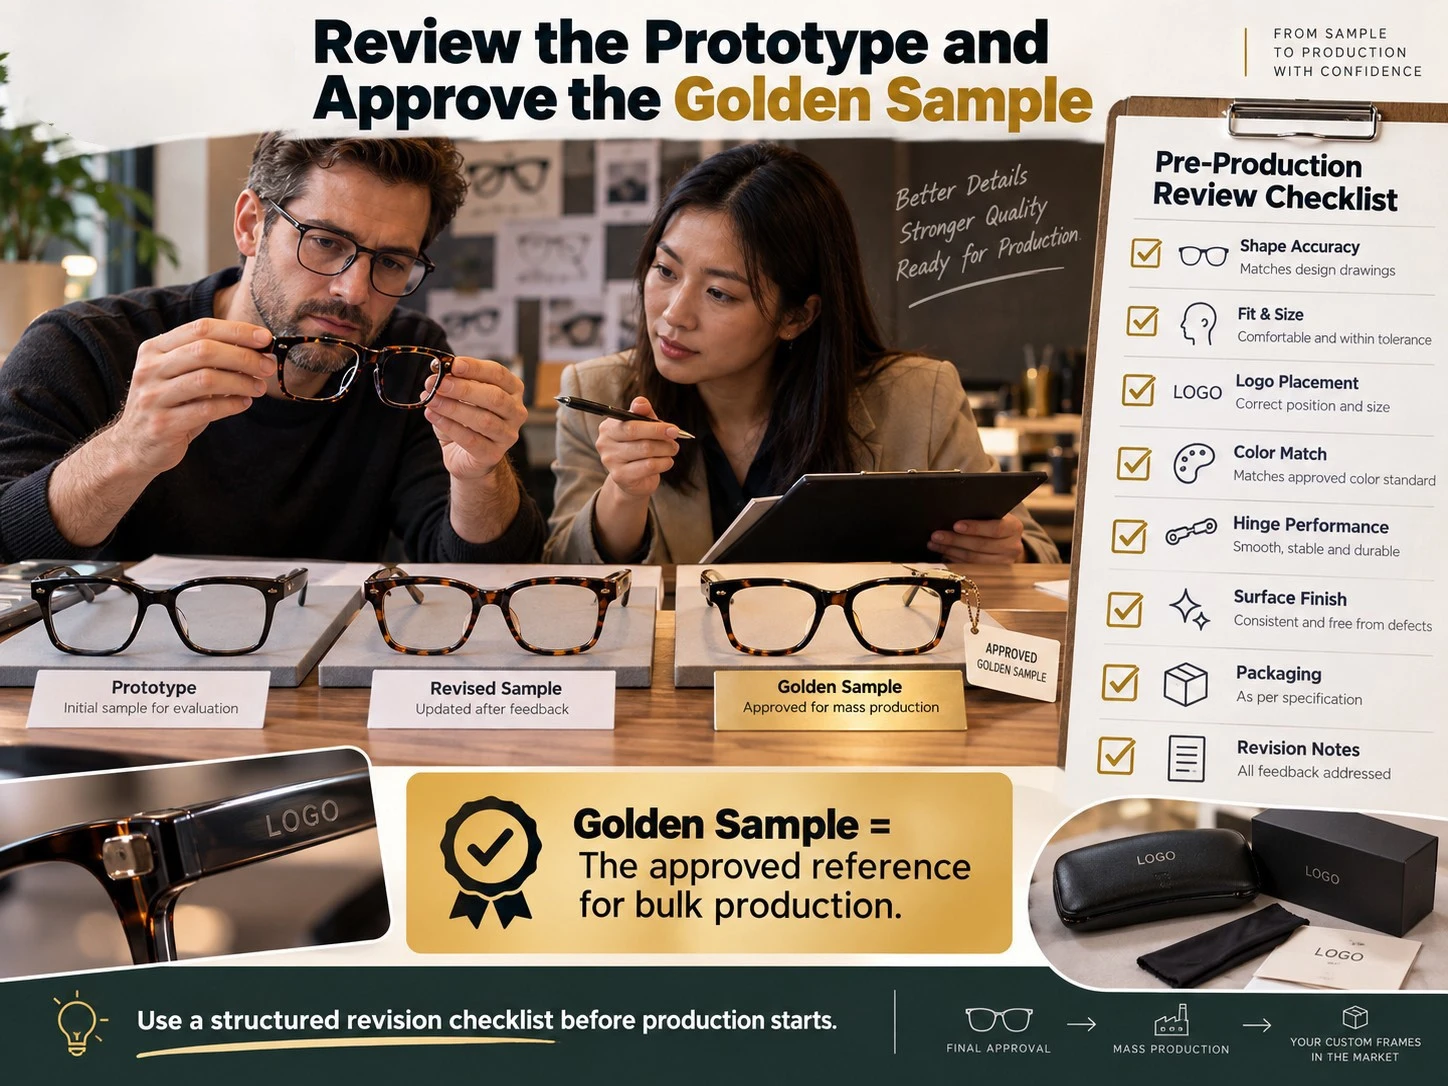
Step 6 - Review the Sample With a Structured Revision List
Do not send revisions as ten separate WhatsApp messages over four days.
Use one consolidated review sheet with photos, measurements and a clear decision for every item.
| Review Item | Status | Required Action |
|---|---|---|
| Front shape | Approve / Revise | Mark the exact contour change |
| Dimensions | Approve / Revise | State current vs target measurement |
| Material | Approve / Revise | Confirm exact material reference |
| Color | Approve / Revise | Attach physical code/reference |
| Hinge / Hardware | Approve / Revise | Confirm model, finish and position |
| Logo | Approve / Revise | Confirm artwork, size and location |
| Surface Finish | Approve / Revise | Specify polish, matte, brushed, etc. |
| Packaging | Approve / Revise | Confirm retail packing before production |
The most efficient feedback is measurable.
"The temple feels too heavy" starts another discussion.
"Reduce temple thickness in this marked area while maintaining hinge strength" gives the engineering team something they can actually evaluate.
Why the "Golden Sample" Matters Before Bulk Production
The golden sample is the final approved physical reference used to align the buyer, sales team, engineering, production and QC.
It should represent the approved geometry, dimensions, material, color, hardware, logo and finish.
"Golden sample" is an industry production-control term, not a substitute for applicable standards or testing; its value is reducing disputes based on memory, screenshots or obsolete sample versions.
Common Problems That Delay Custom Spectacle Frame Development
1. A Design Image With No Dimensions
A front-view image cannot define the exact bridge, lens width, temple length or thickness. If the factory must guess, revision rounds follow.
A visual reference tells the factory what you like. A technical specification tells the factory what to manufacture.
2. Changing Material After Prototype Approval
Moving from acetate to injection material, or from one metal construction to another, is not a cosmetic edit.
It can change the manufacturing route, tooling, frame thickness, hinge construction and finishing process.
Material should therefore be confirmed before final prototype approval.
3. Endless Design Changes Without a Freeze Point
If the lens, bridge and temple keep changing across sample rounds, the project is not merely "delayed by sampling"; the design is still open.
Set a decision deadline and freeze parameters by stage.
Without a freeze point, neither the factory nor the buyer can accurately control tooling, materials, production scheduling or final cost.
4. Changing the Logo Artwork Late
A new logo proportion may require a different engraving area, printing plate, foil size or metal badge.
Approve the final vector artwork before the pre-production sample.
Your brand logo is not a decoration added at the end. Its dimensions and position are part of the product specification.
5. Asking a Factory to Copy an AI-Generated Image Exactly
AI images are useful for concept exploration, but they can contain impossible or inconsistent geometry: disconnected hinges, changing temple thickness, unassemblable decoration or surfaces created by lighting rather than real material.
Use the AI image as a visual brief, rebuild manufacturable elements as technical geometry, then approve a physical prototype.
A good manufacturer should not promise "100% identical to the AI image" before engineering review.
Conversely, the supplier should also clearly state the following three points:
What can be reproduced.
The overall silhouette, color direction, decorative concept or visual proportion may be achievable.
What must be modified.
Hinge structure, material thickness, lens groove, nose construction or decorative connections may need adjustment.
Why the modification is necessary.
The final frame has to be manufactured, assembled, fitted with lenses and reproduced consistently-not simply look convincing in one rendered image.
For a brand owner, this engineering translation is more valuable than a factory saying yes to every visual request.
From Sample Approval to Bulk Production: What Must Be Frozen?
Once the pre-production sample is approved, freeze the parameters that define the product:
- Technical drawing and revision number
- Frame and temple dimensions
- Material grade or material reference
- Approved color reference
- Hinge and hardware
- Logo artwork, method, size and position
- Surface finish
- Demo lens or lens requirement
- Packaging artwork and packing method
- Approved sample version
- QC criteria
- Market-specific testing requirements
Any change after this point should go through change control because even a "small" edit can affect tooling, purchasing, production setup or inspection.
This is particularly important when the order contains several colors or SKUs.
A buyer may approve the black sample and assume every other color automatically uses identical hardware, logo placement and finish. Unless those specifications are documented across the collection, differences can enter production unnoticed.
Freezing the specification creates one version of the truth for purchasing, production and QC.
Conclusion - Approve the Process, Not Just the Frame
Successful custom spectacle frames come from controlled decisions, not from repeatedly asking the factory to "make it closer to the picture."
Define the customization level. Freeze the design brief. Convert visuals into technical measurements. Confirm the material before sampling. Approve physical color and branding references. Review the prototype with a structured checklist.
Then sign off a golden sample and freeze the production specification.
That process protects your launch date, reduces avoidable sample rounds and gives the factory a clear reference for bulk QC.
If you are developing a new optical collection, send Finewell Eyewear your design file or reference image, target material, expected quantity, destination market and launch deadline.
We can evaluate three routes-private label, modified ODM or full custom development-and recommend the most practical path before you commit to tooling or bulk production.
Send us your frame concept and target quantity to get three customization options for your next collection.


